How to Use Automatic1111 for AI Image Generation: A Comprehensive Guide
Automatic 1111 is the most popular interface for creating images using stable diffusion. It's totally free and open source, and you can even run it locally if you have a good enough GPU. In this tutorial, we're going to go over all you need to know to generate images from text prompts. I'm going to assume you already have it installed and running. Let's jump right in.
Updating to the Latest Version:
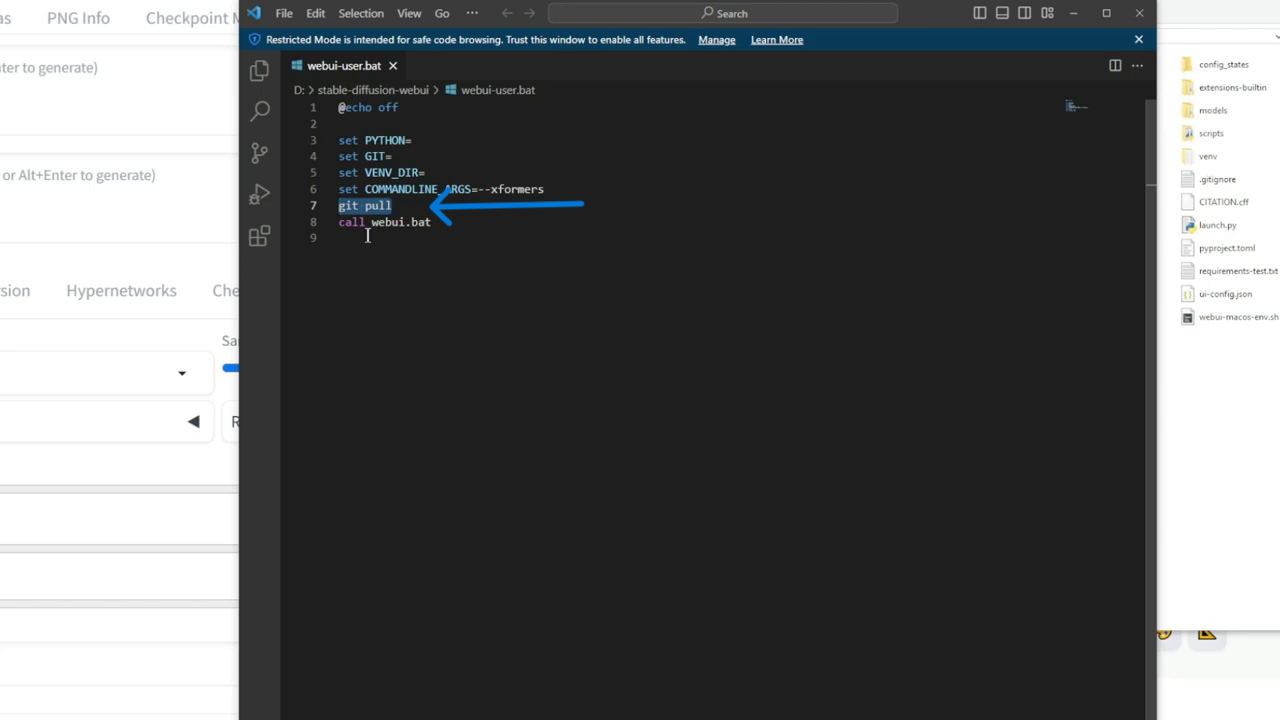
Just so you know, I'm using the latest version of Automatic1111, which is version 1.6. If you have an older version you can update it by simply opening this web UI user.bat file in Notepad, Wordpad, or a code editor and then adding ‘git pull’ right before the call statement. This will update your Automatic1111 to the latest version, but you don't have to update it to follow along in this tutorial. Most of the settings I'll go over will be the same in older versions as well.
Checkpoints:
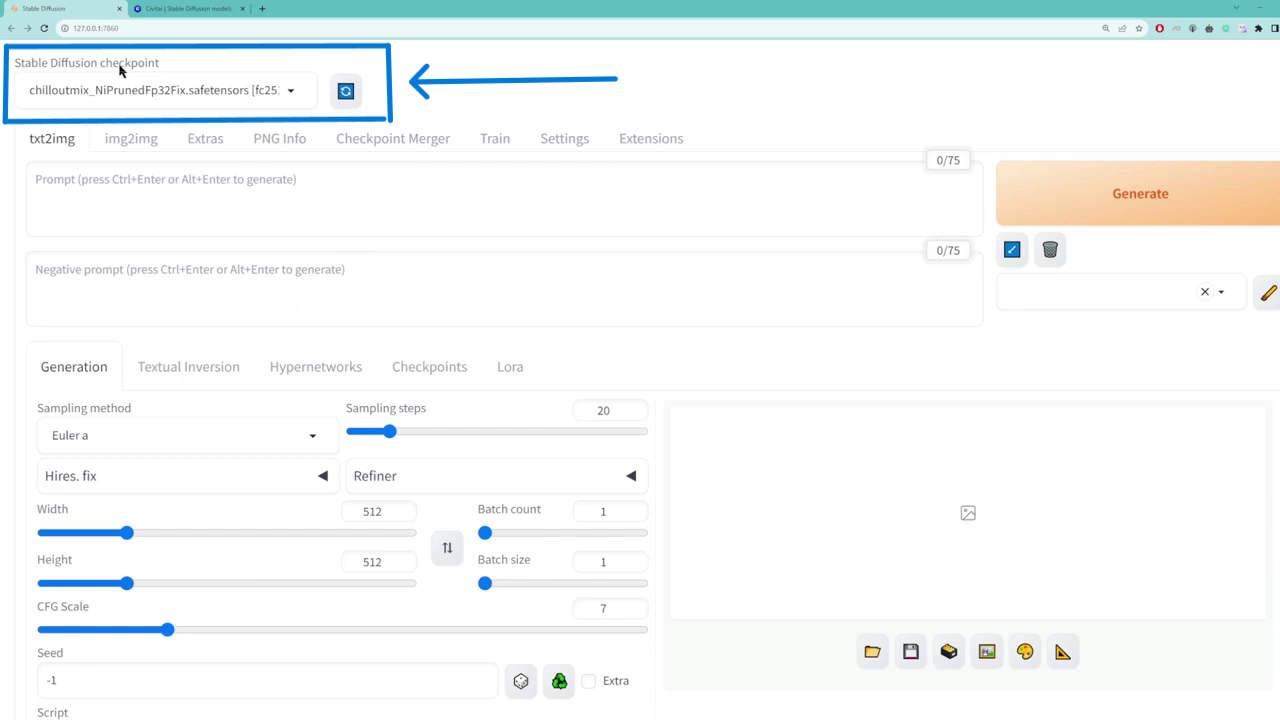
After opening the interface, the first thing you'll notice at the top is the checkpoint. This defines the style of image that you want to generate. Usually, the default stable diffusion checkpoint isn't good enough, so you'll want to search for a checkpoint that suits the style you want.
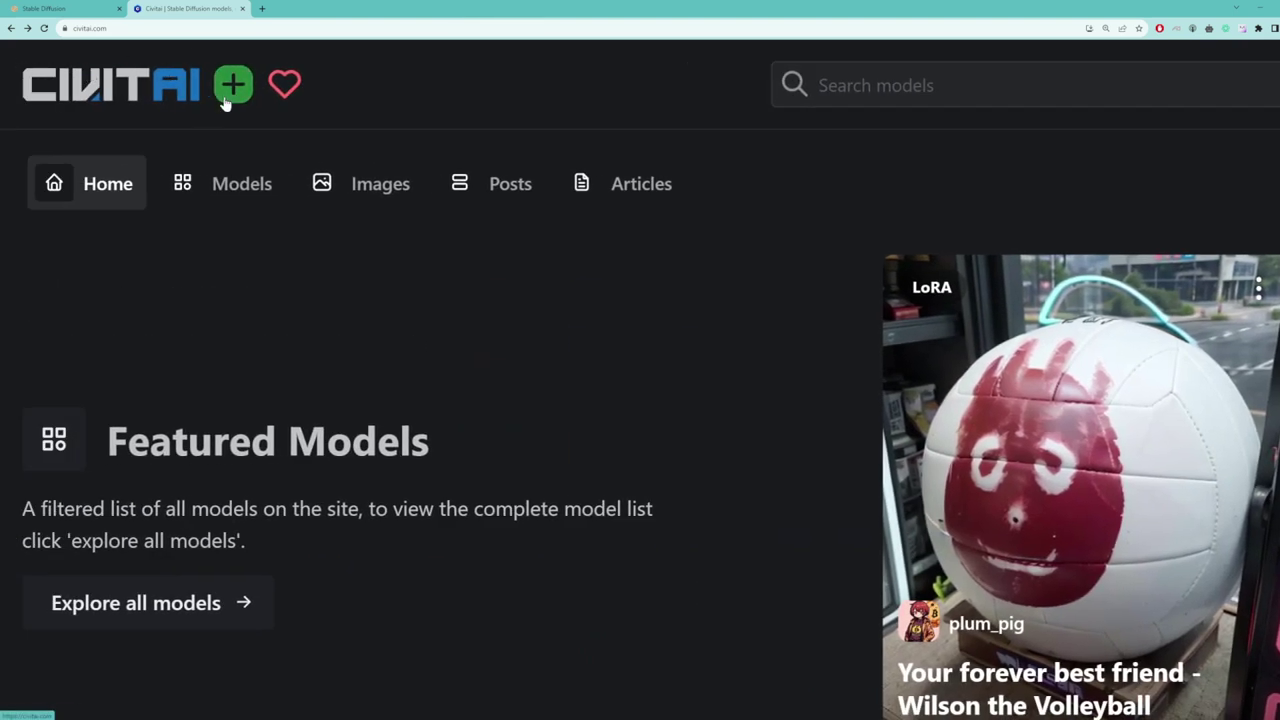
A good place to search for checkpoints is CivitAI. Click on the models tab, and then in the filters, select checkpoint only. In the style section, you can find hundreds, if not thousands, of checkpoints that you can choose from.
Once you've found the one that suits you, click into it and then download the checkpoint. Just a warning, though, these checkpoints are usually huge, like a few gigabytes in size, so it's going to take a while to download. Make sure you save the checkpoint to the folder models/stable diffusion. Once you've done all these steps, it'll show up correctly in this checkpoint dropdown.
Tabs & Settings:
Next, you'll see a bunch of tabs. Each of these offers different functions. For this tutorial, we'll go over the text-to-image tab, but just know that you can also do image-to-image and upscale images in the extras tab. I'll make tutorials about these tabs as well in the future.

The rest of the tabs are more advanced, and most of you would probably never need to use them. One quick thing to note is that in the settings tab, you can change the format of the images you create. For example, you can set it to JPG instead of PNG. You can also set the image quality, max size, etc. Alright, let's go back to the text-to-image tab.
Prompting:
Like the name implies, this tab allows you to type in a text prompt to generate an image. The first box is the positive prompt. This is what you want the image to contain. Now, there's a whole art behind prompting, so if you want to get good at it, look at previous examples and notice patterns in keywords that people are using.

Again, a good resource for that is Civitai. If you click on whatever checkpoint you're using, you can scroll down to view images that other people have generated using that checkpoint. If you click on the image, most of them would contain the prompts and negative prompts that they have used. Notice that a few keywords are used quite often, such as masterpiece, 8K, absurd res, intricate details. These keywords allow you to add more details and sharpness to your image.
It's always best to specify as much details as possible on your character and the background. For example, what color is her hair? What is she wearing? What's the background like? Is she in the city? Is she indoors, outdoors, at the beach, at the park, etc.?

And then for the negative prompt, this is what you want to exclude from the image. Again, browse through the images in Civitai to get a sense of what other people are using for the negative prompt. You'll notice some common keywords, such as easynegative, paintings, sketches, worst quality, low res, normal quality, blurry, monochrome, grayscale, extra fingers, fewer fingers, extra limbs, deformed limbs, bad anatomy.
And to generate the image, click "generate." Once the image has finished generating, you can simply click into it, and then to save it, right-click and then "save image."
Seed:
Let's jump down to seed real quick. So seed is a number that defines the starting point of your image. Even if you keep all the other settings the same, if you use a different seed number, you'll get a completely different image.

If we want to generate the exact same image, not only do we need to keep all the settings the same, but we need to use the same seed number. If you set the seed to -1, it would randomly generate a number for you.
For this tutorial, we're going to tweak all of these other settings so you can see what they do. But in order to get a valid before and after comparison, we'll need to keep the seed number the same throughout all these tweaks.
Sampling Method:
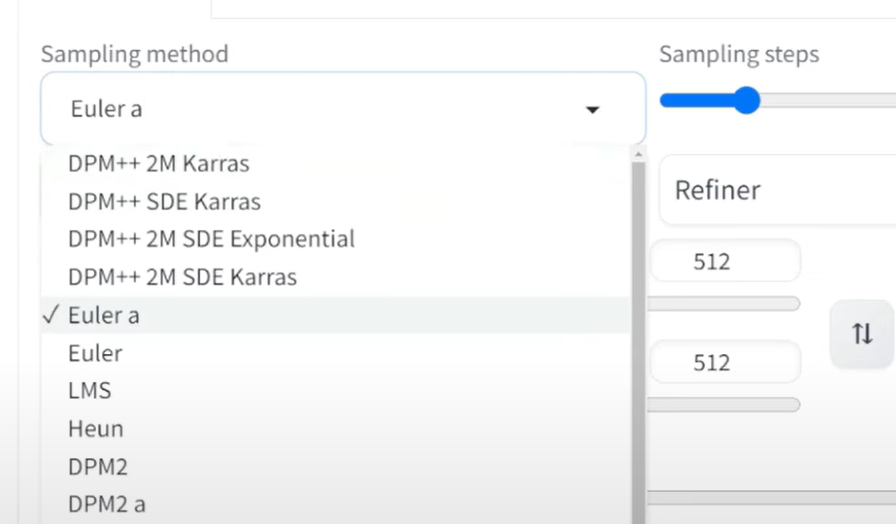
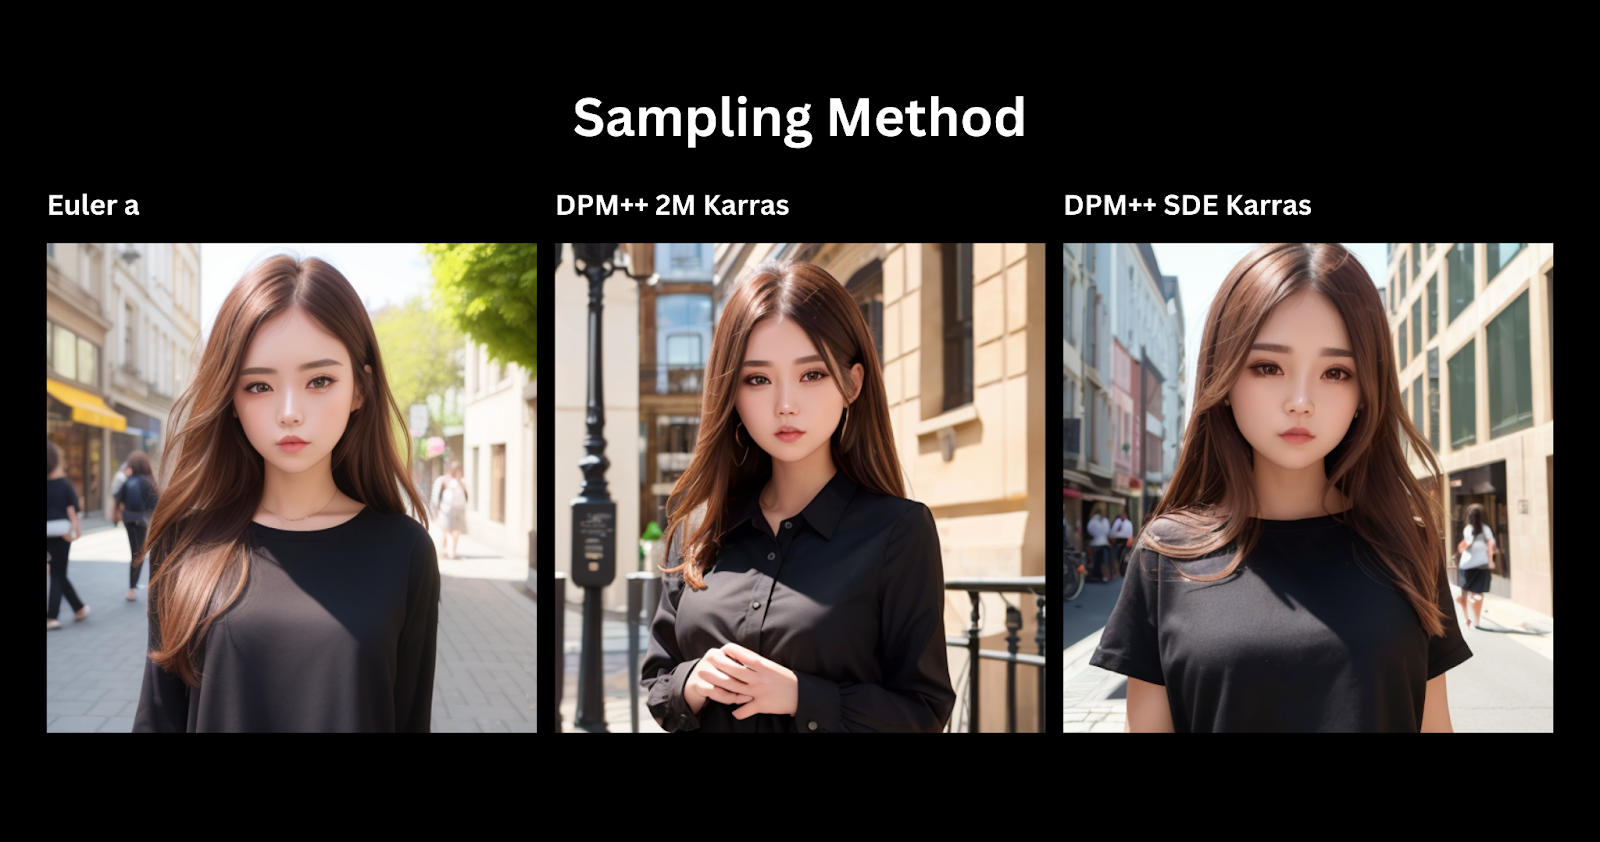
Let's jump back to the sampling method. This is basically the algorithm that is used to generate the image. Each of them has subtle differences, so it's pretty much trial and error to see which one works best for you and the checkpoint. In general, Euler A tends to be the fastest, but the face doesn't really look realistic. DPM++ 2M Karras and DPM++ SDE Karras tend to produce better results.
I'll run these three for you so you can compare and contrast and see for yourself. We'll use the same prompt and keep the same seed so you get a valid comparison.
Sampling Steps:
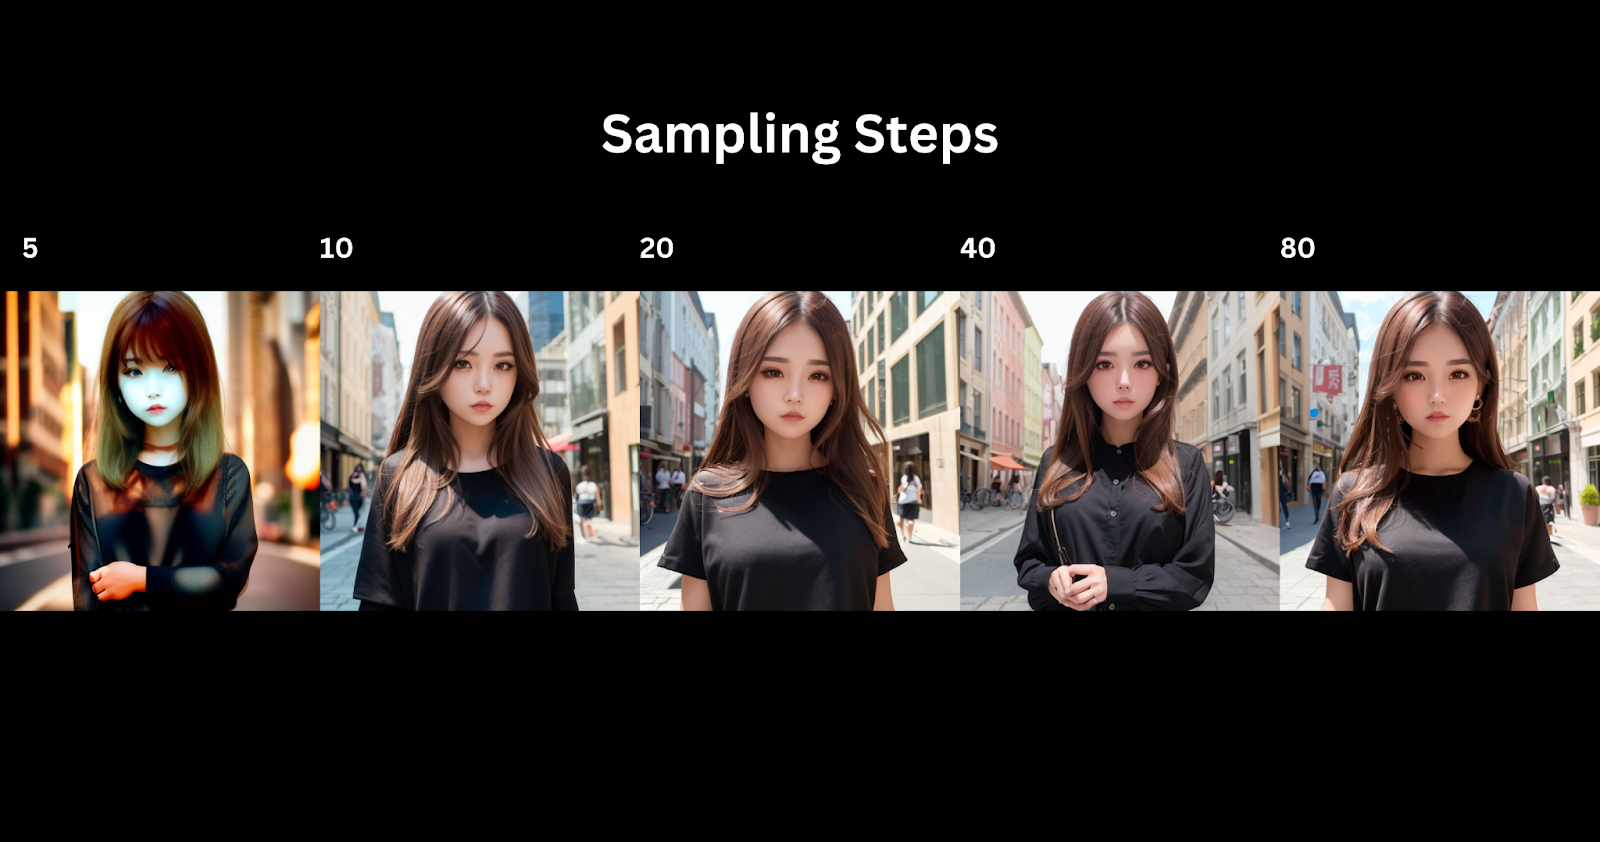
Next up, we have sampling steps. This is how many rounds you want the AI to go through to generate your image. Each round adds slightly more detail and definition to your image, but at a certain point, if you have too many rounds, then it overtrains, and you're going to get some weird results like noise and artifacts.

Generally, a value between 20 and 30 works best. I'm going to keep everything the same but only adjust the sampling steps so you can see how that affects your image. Let's do 5 steps, 10 steps, 20 steps, 40 steps, and finally, 80 steps.
Width & Height:
Below that, we have width and height. This defines the dimensions of your image. Pretty straightforward. So instead of 512 by 512, if you set this to 800 by 512, then the image that you generate will be 800 by 512.
Batch Count & Size:
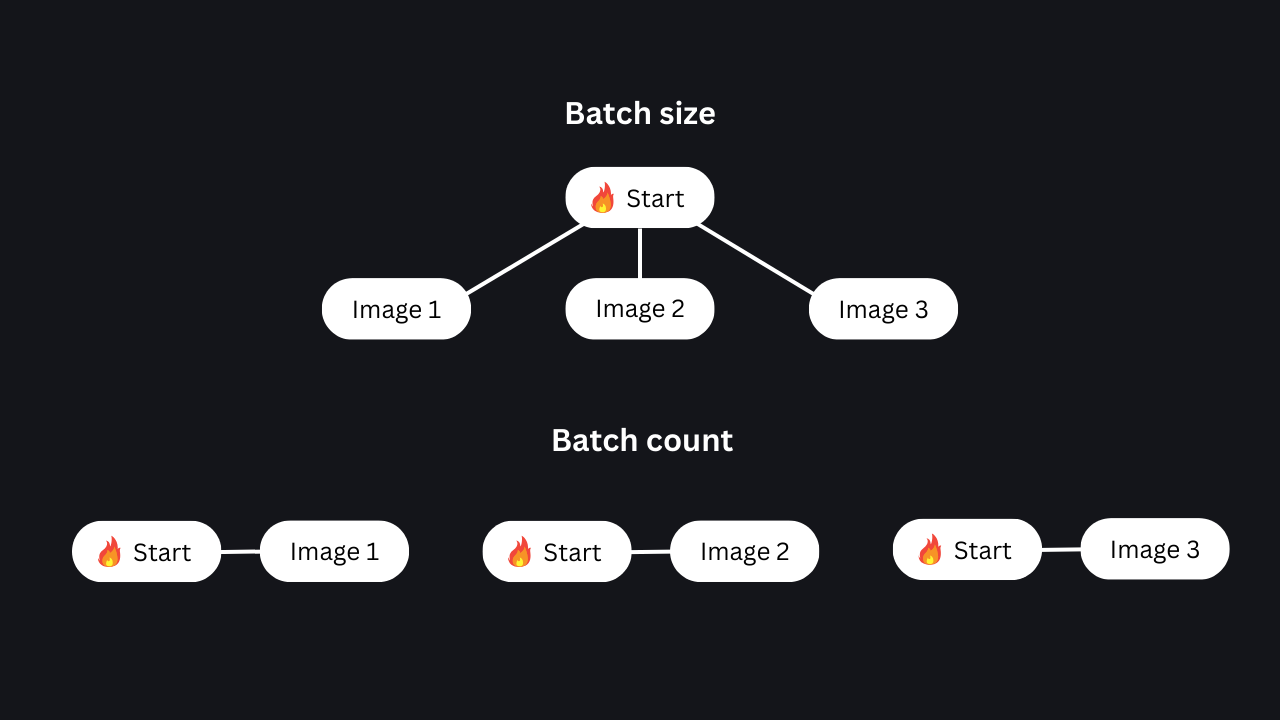
Next, we have batch count and batch size. Both of these define the number of images that you want to generate in one go. If you set this to two, it'll spit out two images. If you set this one to two, it'll also spit out two images.

So what's the difference? You can think of this whole image generation AI as like an engine of a car. Batch size is the number of images to generate simultaneously from just one start of the engine. If you set the batch size to 3, the engine starts once and creates three images in parallel. This option is slightly faster, but you'll need to have enough VRAM to handle this. If you don't, you can use batch count. If you set the batch count to three, basically, you start the engine to create one image, then you start the engine again to create the second image, and so on. In other words, the images are produced one after another in a series. So again, if you have enough VRAM or memory, then batch size would be slightly faster. If not, you can always use batch count.
CFG Scale:
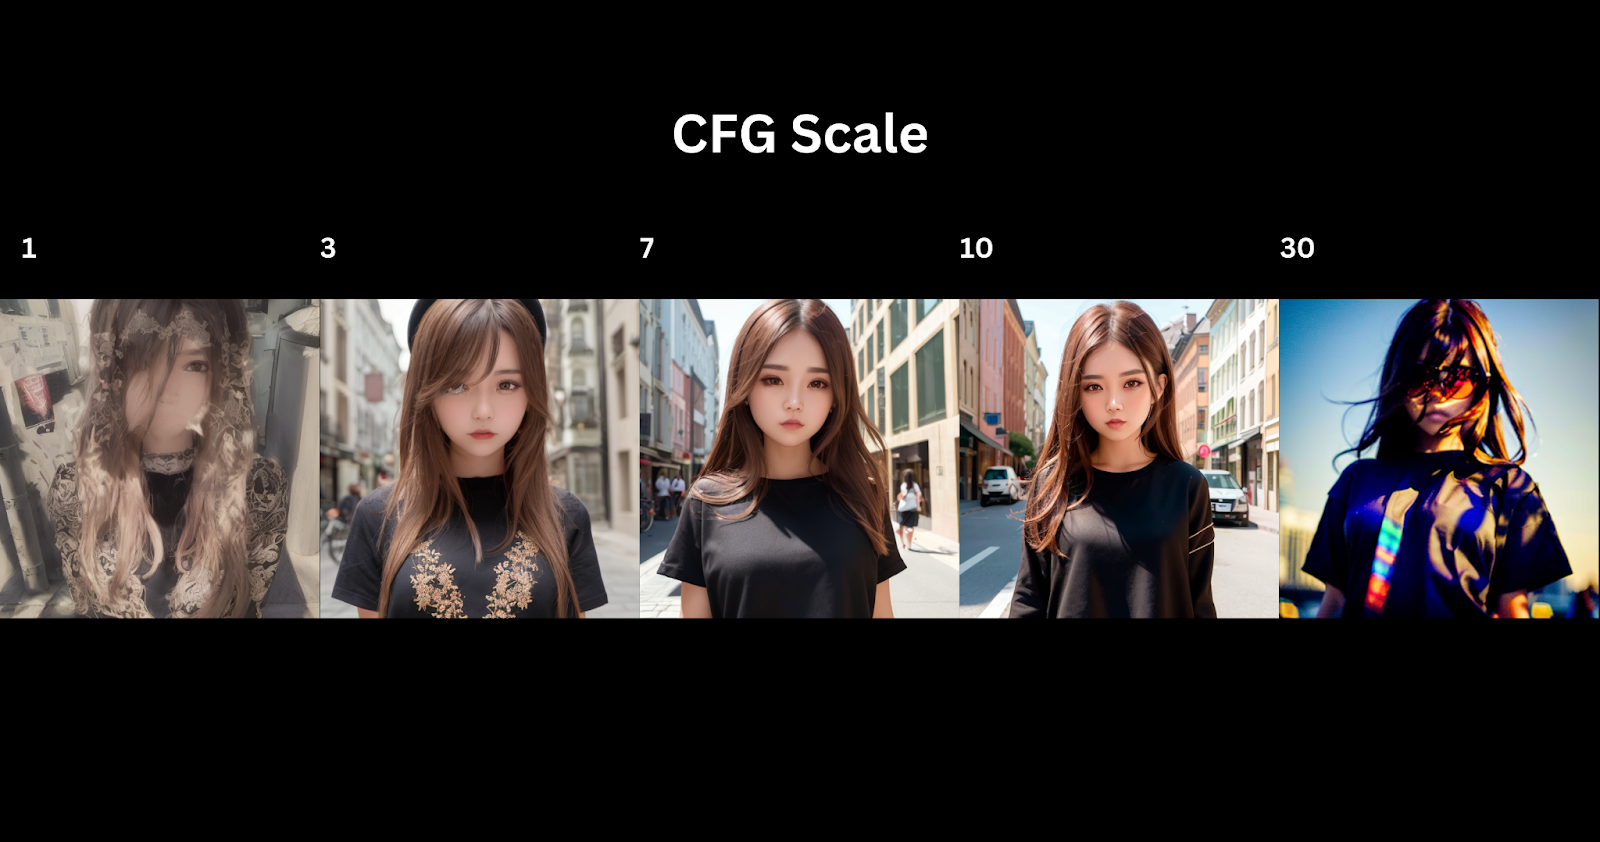
Next up is the CFG scale or guidance CFG scale. This is how much you want the engine to follow your prompt. If you drag this all the way to the left, it'll follow your prompt less. If you drag it to the right, it'll follow your prompt more, but sometimes too literally, and it'll give you some strange results. Generally, a value from 6 to 8 works the best. Let's try it with a few values. So here's the same settings, but I'm going to set the CFG to 1, and here it is with 3, and then let's set it to 7, and then 10, and finally, 30.
Hi-Res Fix & Refiner:
Hi-res fix would upscale your image by a multiple. So if your image is 512 by 512, and you select upscale by 2, then your image would be increased two times, or it would be 1024 by 1024.

You can choose different algorithms for upscaling; again, each of these has subtle differences, so you'll need to play around with each one to see which works best for you. Let's test out a few right now.
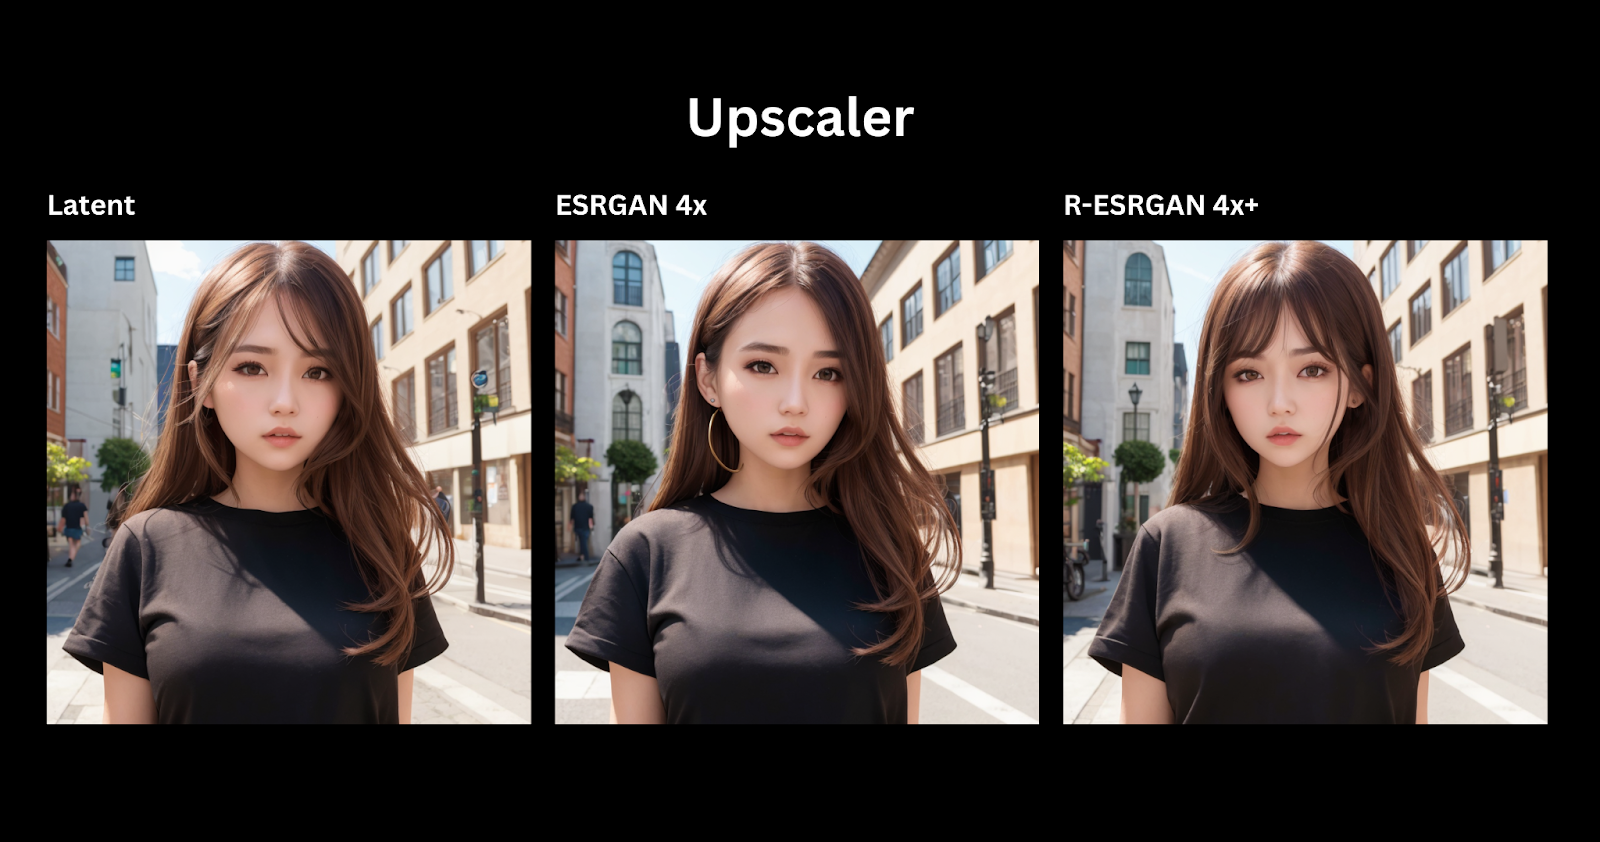
Hi-res steps is similar to sampling steps above. This is how many steps of upscaling you want. If you set it to 0, it's not actually zero steps; it uses the number of steps above, which in our case is 20. Like sampling steps, the more you have, the more defined your image will be. So if you set the hi-res steps to 1 only, you're not going to get a very defined image. Usually, a range of 15 to 25 steps would be best. So let's set it to 15 and see what we get.
Denoising strength is how much you want the upscaler to follow your original image. If you drag it all the way to the left, it's not going to make any changes to the original image. If you drag it all the way to the right, you're going to get a very different image. So keeping it at around the middle is a good balance between retaining your original image but also adding some additional details and elements. Let's try testing a few values of denoising strength while keeping everything else constant. So here's the denoising strength at 0.1; you can see it's very similar to the original image. And here's the denoising strength at 0.5, and finally, let's set it to 0.9.
As a final note on hi-res fix, though, I would not recommend using this to upscale your images here. That's because if you generate a lot of images, and you have this option on, it's going to upscale all of those images; it's going to take up a lot of bandwidth and a lot of time. Whether you like the images or not, it's best to generate tons of small images and then choose only the ones that you like and then send those images to the extras tab where you can upscale it further. It's exactly the same settings that you see here.
Okay, next up is the refiner window. This is only for SDXL, which is a newer version of stable diffusion. SDXL is actually quite early, and the quality of results isn't as good. But if you're curious how this refiner thing works, it adds more details to your image by running your prompt through an additional model. But again, this refiner option is only for SDXL, which isn't really mature yet as of right now. So it's better to keep using the standard version of stable diffusion and leave this option off.
LoRAs:
Final thing I want to mention is LoRAs. So at the beginning, we chose a checkpoint which defines the style of the image we want to generate. Well, we can actually add more models to this to define our images even further. These models are called LoRAs, which are basically smaller versions of checkpoints. They're usually trained on generating certain types of objects. To find and download LoRAs, simply go back to Civitai and then in the models tab, click the filter dropdown and select only LoRa.
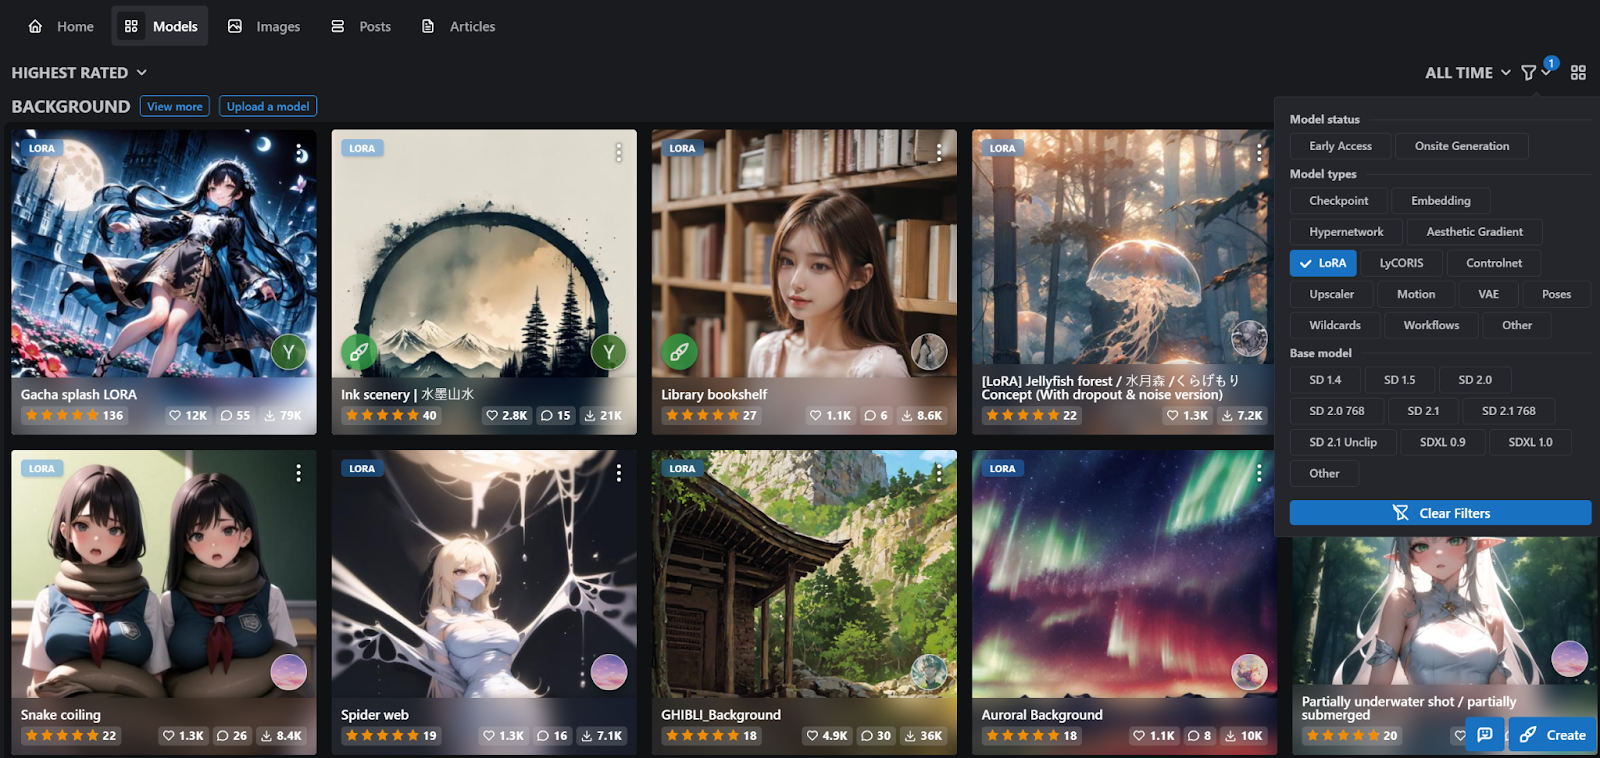
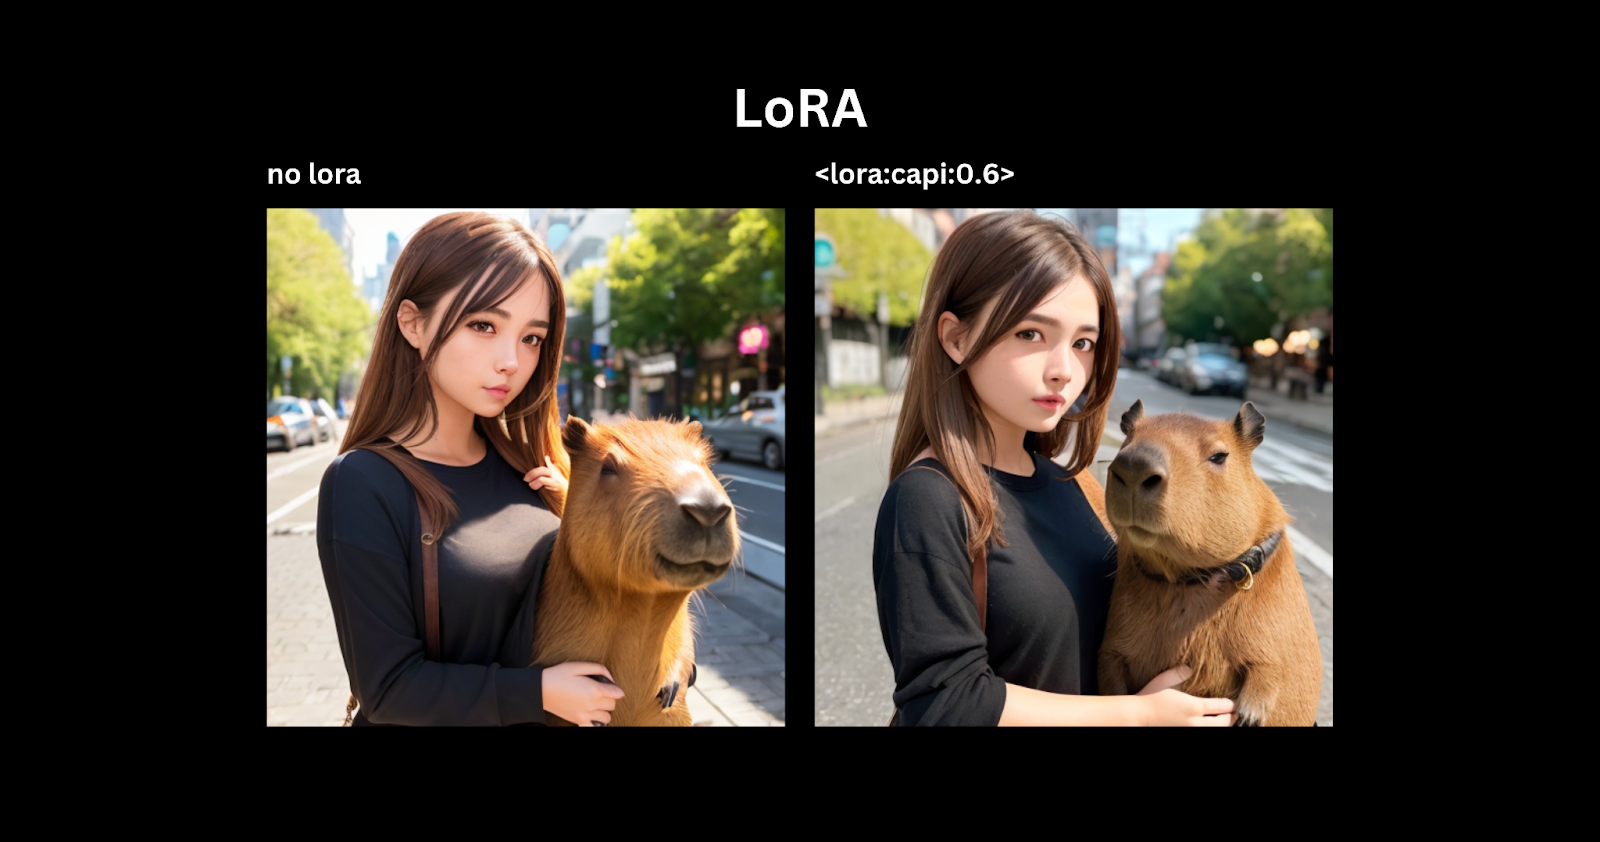
For example, let's say you want to add a capybara to your image. Chances are your original checkpoint was not trained on any images of a capybara, so it wouldn't even know what a capybara is.
We can download Capybara LoRa and save it into our models/LoRa folder. Going back to our interface here in this LoRa tab, you should be able to see the capybara LoRa. If not, try hitting the refresh button, and if you still don't see it, try restarting the whole interface.
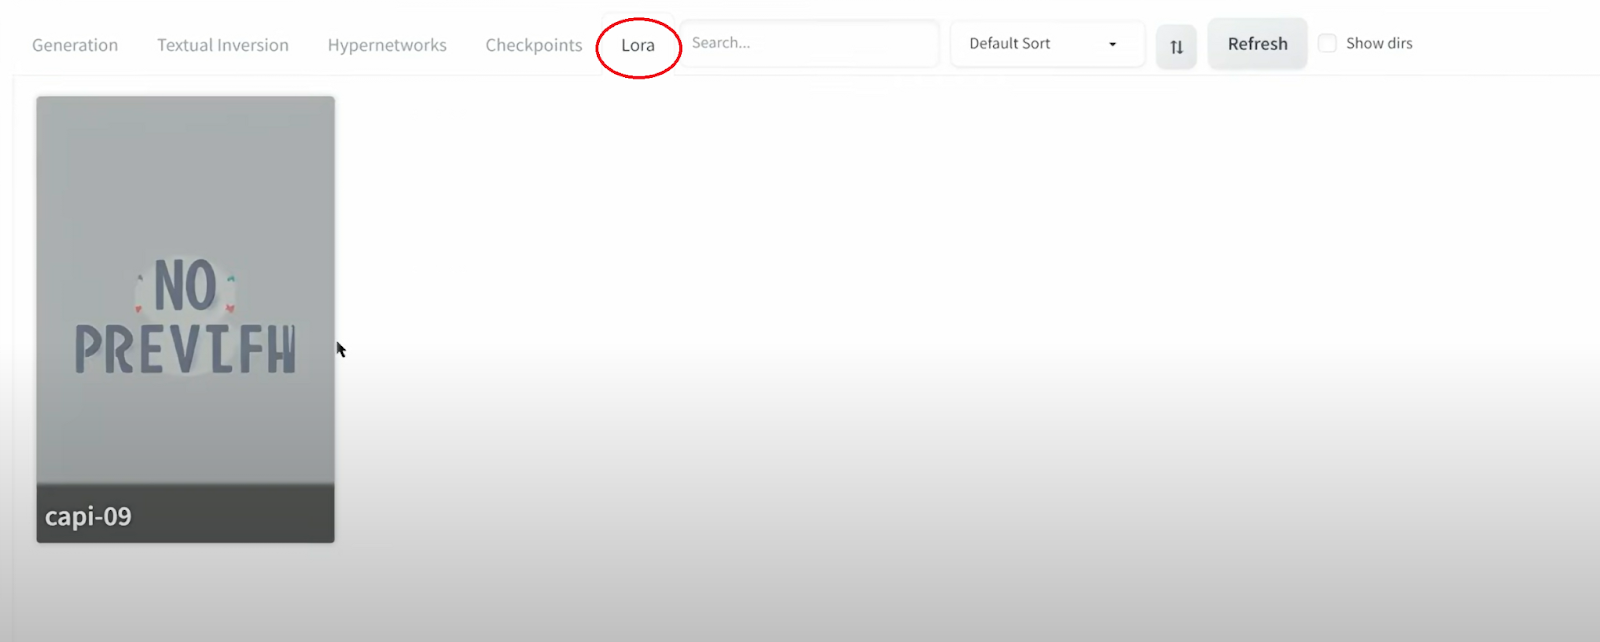
Now to add and use the LoRa to your image, you need to click into the LoRa, and then after that, you can see the following text added to your prompt. You'll notice a number next to the LoRa; this is the weight you want to set the LoRa. This is how important you want the LoRa to be or how much emphasis you want to place in the LoRa. Usually, a value between 0.3 and 0.8 works well. If you set it to 1 or 2, it's going to be too extreme. Something to note is you can also set a negative value. So if you set this to -1, for example, it's going to really exclude capybaras from your image. Think of this as like a negative prompt but for your LoRa.

Here's a side-by-side comparison without adding a capybara LoRa to the prompt, and adding the LoRa.
Conclusion
All right, we covered a lot today, but that is all the basics you need to know to create awesome images from text prompts. Note that there are a lot of other capabilities in the other tabs, such as image-to-image and extras, so stay tuned for tutorials on those.
Subscribe to the AI Search Newsletter
Get top updates in AI to your inbox every weekend. It's free!